> For the complete documentation index, see [llms.txt](https://doc.nextbot.ru/llms.txt). Markdown versions of documentation pages are available by appending `.md` to page URLs; this page is available as [Markdown](https://doc.nextbot.ru/functional/integrations/telegram/podklyuchenie/lichnyi-akkaunt-s-business.md).
# Личный аккаунт с Business
Подключение ИИ-агента к Telegram боту который подключен к Business аккаунту
**Личный Business-аккаунт** — тип подключения, при котором ИИ-агент может принимать и отправлять сообщения **от имени вашего личного аккаунта**. Такой формат позволяет сделать общение максимально похожим на диалог с реальным человеком, поэтому пользователи будут воспринимать ответы как обычную переписку.
{% hint style="info" %}
Для этого способа нужна подписка Telegram Premium: раздел «Telegram для бизнеса» доступен только с ней. Агент может ответить клиенту, только если с его последнего сообщения прошло не больше 24 часов.
Если Premium нет или нужно отвечать клиентам позже, подключите аккаунт через отдельную интеграцию [Личный Telegram](/functional/integrations/lichnyi-telegram.md) — по QR-коду, без бота. Чем отличаются варианты — в [сравнении](/functional/integrations/telegram/podklyuchenie.md#lichnyi-telegram-ili-business).
{% endhint %}
## Подключения чат бота к Business аккаунту вручную:
1. Переедите по [ссылке](https://telegram.me/BotFather) и вставьте команду /newbot. Eсли у вас уже есть бот вставьте команду `/mybots` выберите нужного бота и следуйте пункту 3.
2. Задайте имя боту
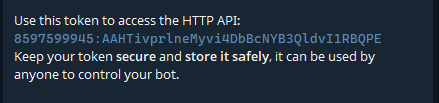
3. Скопируйте HTTP API ключ
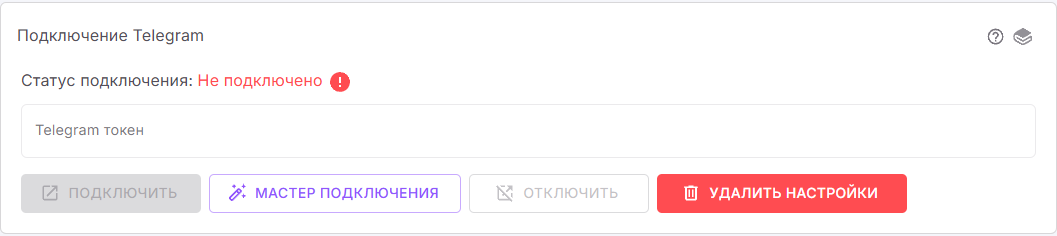
4. Вставьте ключ в поле на странице интеграции
5. Нажмите на кнопку подключить
6. Для подключения к Business аккаунту:\
1\. Заранее выберите бота которого вы хотите подключить перейдя по [ссылке](https://telegram.me/BotFather)\
2\. Зайдите в настройки нажав кнопку **«Bot Settings»**\
3**.** Выберите **«Secretary Mode»**\
4**.** Нажмите **«Turn secretary mode on»**\
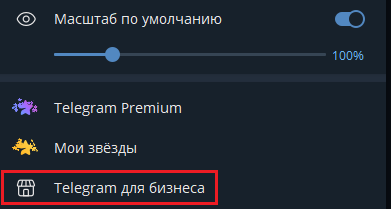
5\. Откройте настройк**и Telegram** в приложении\
**6**. Выберите пункт **«Telegram для бизнеса»**
\
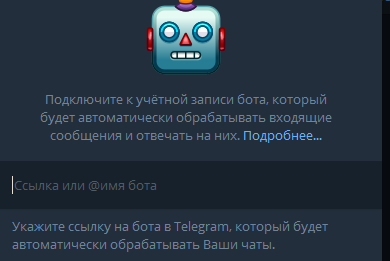
7\. Откройте вкладку **«Чат-боты»**
\
8\. Вставьте название вашего бота @YourBotName или t.me/YourBotName
Готово! 🎉\
Теперь ваш ИИ-агент сможет отвечать сообщения от лица вашего личного аккаунта.
#### Также вы можете подключить интеграцию при помощи [Мастера подключений](/functional/integrations/telegram/instrukciya-dlya-podklyucheniya-telegram-cherez-master-podklyuchenii.md)
---
# Agent Instructions
This documentation is published with GitBook. GitBook is the documentation platform designed so that both humans and AI agents can read, navigate, and reason over technical content effectively. Learn more at gitbook.com.
## Querying This Documentation
If you need additional information that is not directly available in this page, you can query the documentation by asking a question.
Perform an HTTP GET request on the following URL with the `ask` and `goal` query parameters:
```
GET https://doc.nextbot.ru/functional/integrations/telegram/podklyuchenie/lichnyi-akkaunt-s-business.md?ask=&goal=
```
`ask` is the immediate question: it should be specific, self-contained, and written in natural language.
`goal` is what the user is ultimately trying to achieve, the reason they need the answer. Sharing it helps GitBook give you a better, more relevant answer. A goal is most helpful when it describes the outcome the user wants rather than restating the question. For example, with `ask=how do I create an API token`, a goal like `automate deployments from our CI pipeline` lets GitBook tailor the answer to that use case.
The response will contain a direct answer to the question and relevant excerpts and sources from the documentation.
Use this mechanism when the answer is not explicitly present in the current page, you need clarification or additional context, or you want to retrieve related documentation sections.